GMAP Custom Field plugin for Joomla 3.7+ Documentation
Requirement: Joomla 3.7+ | Download
This plg_fields_gmap.zip plugin is a new type of plugin extension for Joomla introduced in the 3.7 version: Custom Fields.
Joomla 3.7 comes with various existing custom field types and we found out that a Geo field was missing.
Basically, plg_fields_gmap allows you to set coordinates (Latitude & Longitude) for com_content's articles, com_users users and com_contact's contacts. It doesn't only provide coordinates, but it will display a GoogleMaps map when the item is rendered. The map is displayed thanks to the GoogleMaps API service and admin can choose for each fields (multiple instances are supported) if it will be displayed using the classing Javascript GoogleMaps map or a static (image) GoogleMaps map.
Various features are included like setting a circular polyline area around the location with a radius parameter, various marker types, colors, map customizations , infowindows etc...
This plugin installs via the usual Joomla installer. Go to your Joomla backend at yoursite.com/administrator, login and go to:
TOP MENU > EXTENSIONS > INSTALL > UPLOAD PACKAGE FILE tab
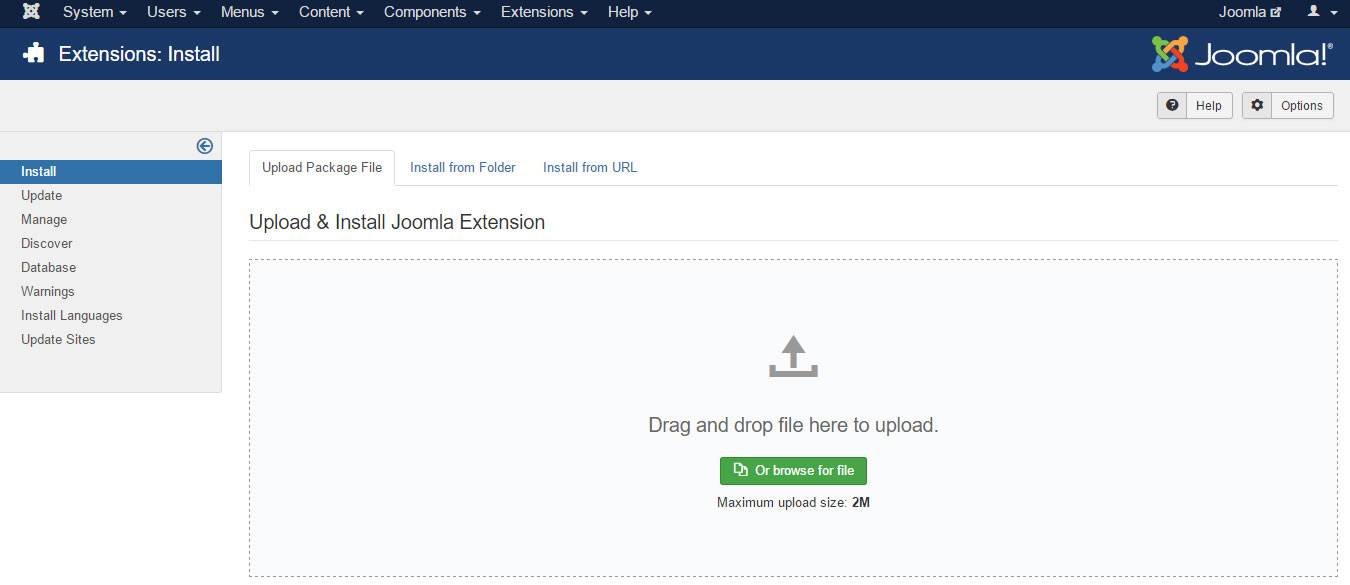
Click the browse button to select the plg_fields_gmap.zip archive on your computer.
Click Upload
Once the plugin is uploaded, it installs automatically. You now have to check its global settings. Go to:
TOP MENU > EXTENSIONS > PLUGINS, filter the list by plugin type: FIELDS
And find the GMAP plugin.
As most settings are specific to fields objects, the plugin's global settings are very limited. Only 2 of these:
Google Maps API Key: This is the required key provided by Google so they know how much you use their service so they can check your quota. To get your API Key, go to the GoOogle console API at
https://console.developers.google.com/
Create a project and visit the LIBRARY page. Include these Libraries:
Input the credentials API key to the relative field in our plugin setting.
Nest Fields: Enable this if you set 2 or more GMAP fields to your articles, users or contacts and want only one map to be displayed, showing all the fields markers. In that case, the map center and zoom will be set automatically to make sure all markers are visible from the map loading. You can disable this if you never add more than one GMAP field to items.
Now the plugin is set and ready, we can create our first field. Custom Fields are supported by at least 3 components in the Joomla core: com_content (articles), com_users & com_contacts. Choose one of these for your first GMAP Field. Go either to:
TOP MENU > CONTENT > FIELDS (for fields to show in Joomla Articles)
or
TOP MENU > COMPONENTS > CONTACT > FIELDS (for fields to show in a contact page)
or
TOP MENU > USERS > FIELDS (for fields to show in Joomla User profiles)
Click the NEW button, and let's create your first GMAP Custom Field
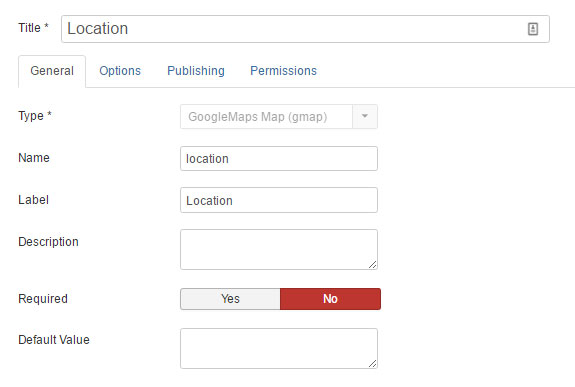
Title: Set a descriptive title for your GMAP field
Type: if the plugin is enabled, your'll find the field: GoogleMaps Map (gmap) plugin type. Select it
Name: this should be filled automatically after saving the field once
Label: Set the label for your field
Description: You can set a description for the field, it will show when a user woul hover the field label with the mouse cursor
Required: Should the user ba able so submit the form without setting the field
Default Value: Don't set it here. Default values are to be set in the following section
Form Settings sectionThis section shows settings for the form field map.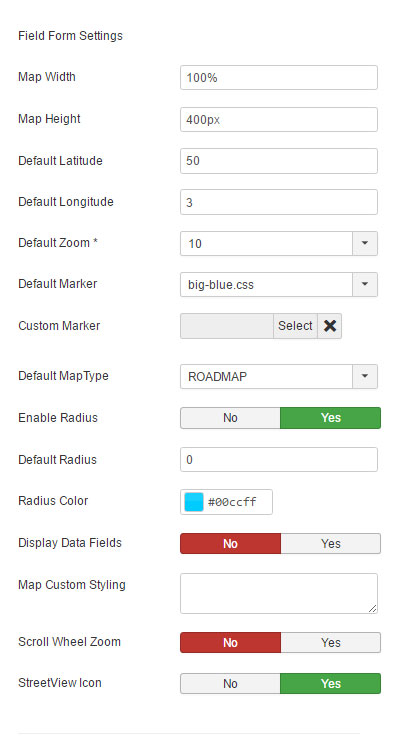
Map Width: set the width of the form map. Don't forget to specify % or px units
Map Height: set the height of the form map. Don't forget to specify px unit
Default Latitude & Default Longitude: Default coordinates to load the form map
Default Maptype: Select the default maptype for the backend
Map Custom Styling: You can customize the map layout colors. This will override your MAPTYPE setting in the previous parameter. Basically you need to paste in this field, the JSON code you get on https://mapstyle.withgoogle.com/
Settings for the rendered field maps
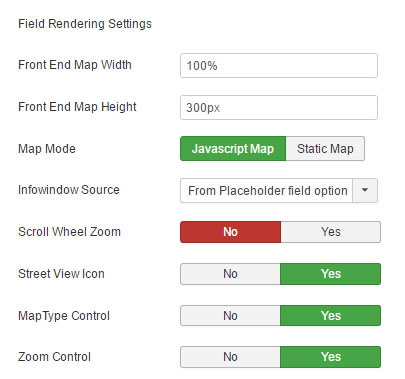
Front End Map Width & Height: Front map differs from the form map. You can set it with its own dimensions
Map Mode: Select if the field map should be rendered thanks to the GoogleMaps JAVASCRIPT or STATIC API. Javascript is the default classic interactive GoogleMaps map. The STATIC Maps use the GoogleChart API to render a GoogleMap as an image. Both maps can nest multiple fields as multiple markers, both maps can be styles, both maps markers can have radius areas. Only map markers can not be customized on the Static Maps as they can on a Javascript map. On a Static map, Markers can be tiny or normal (size) and colored (10 colors presets).
Infowindow Source: You can enable the infowindow for each markers. It's content can be the field title, description or placeholder hint.
Default Marker: (Javascript API only) Default markers are CSS markers with a pulse animation. You can select if from various presets and also add your own edits of the CSS
Custom Marker: You can also prefer a PNG marker, select a one from those we included or upload your own.
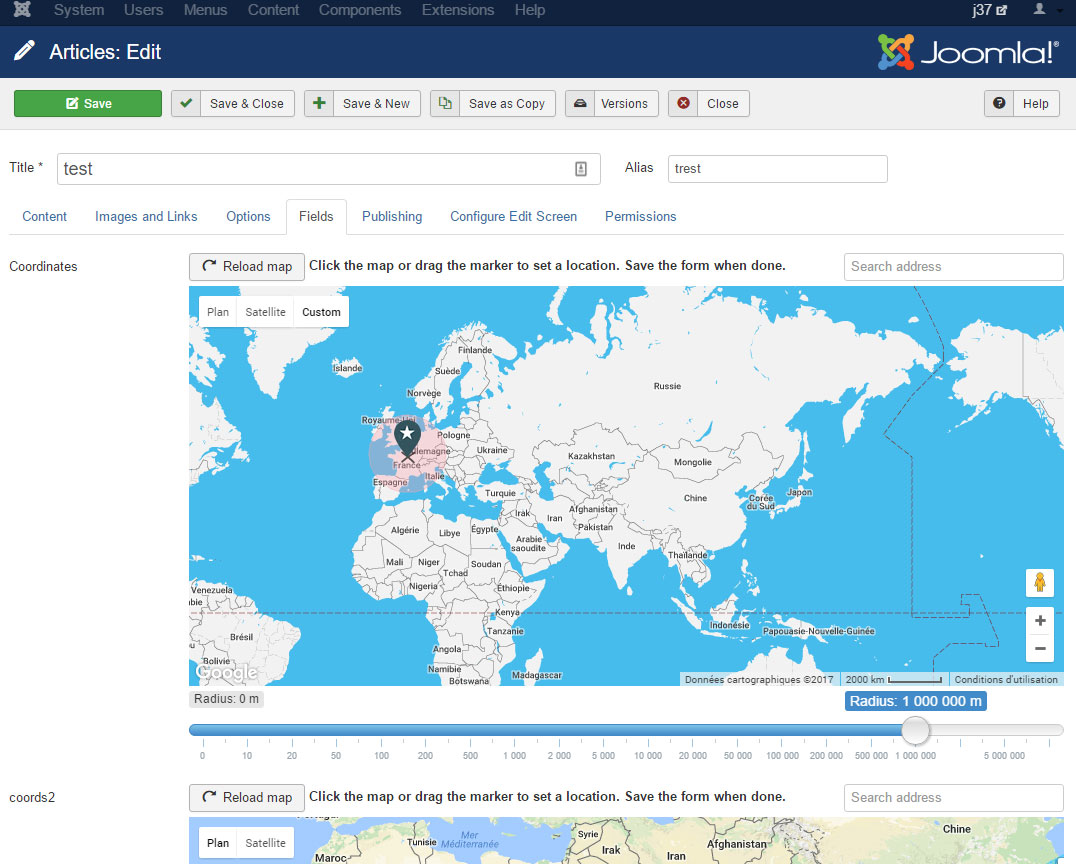
When the field is created and saved, it can be edited in the Article forms, User Forms, Contact forms, depending on where you set it.
INTRODUCTION
This plg_fields_gmap.zip plugin is a new type of plugin extension for Joomla introduced in the 3.7 version: Custom Fields.
Joomla 3.7 comes with various existing custom field types and we found out that a Geo field was missing.
Basically, plg_fields_gmap allows you to set coordinates (Latitude & Longitude) for com_content's articles, com_users users and com_contact's contacts. It doesn't only provide coordinates, but it will display a GoogleMaps map when the item is rendered. The map is displayed thanks to the GoogleMaps API service and admin can choose for each fields (multiple instances are supported) if it will be displayed using the classing Javascript GoogleMaps map or a static (image) GoogleMaps map.
Various features are included like setting a circular polyline area around the location with a radius parameter, various marker types, colors, map customizations , infowindows etc...
INSTALLATION
This plugin installs via the usual Joomla installer. Go to your Joomla backend at yoursite.com/administrator, login and go to:
TOP MENU > EXTENSIONS > INSTALL > UPLOAD PACKAGE FILE tab
Click the browse button to select the plg_fields_gmap.zip archive on your computer.
Click Upload
PLUGIN SETUP
Once the plugin is uploaded, it installs automatically. You now have to check its global settings. Go to:
TOP MENU > EXTENSIONS > PLUGINS, filter the list by plugin type: FIELDS
And find the GMAP plugin.
As most settings are specific to fields objects, the plugin's global settings are very limited. Only 2 of these:
Google Maps API Key: This is the required key provided by Google so they know how much you use their service so they can check your quota. To get your API Key, go to the GoOogle console API at
https://console.developers.google.com/
Create a project and visit the LIBRARY page. Include these Libraries:
- Mandatory: Google Maps JavaScript API: Required to render the map used to set a location, clicking on the map overlay and / or dragging markers
- Mandatory: Google Places API Web Service: Required to be able to move the locator map to specific addresses
- Optional: Google Static Maps API : Required if you choose to render maps as static images.
Input the credentials API key to the relative field in our plugin setting.
Nest Fields: Enable this if you set 2 or more GMAP fields to your articles, users or contacts and want only one map to be displayed, showing all the fields markers. In that case, the map center and zoom will be set automatically to make sure all markers are visible from the map loading. You can disable this if you never add more than one GMAP field to items.
FIRST FIELD CREATION
Now the plugin is set and ready, we can create our first field. Custom Fields are supported by at least 3 components in the Joomla core: com_content (articles), com_users & com_contacts. Choose one of these for your first GMAP Field. Go either to:
TOP MENU > CONTENT > FIELDS (for fields to show in Joomla Articles)
or
TOP MENU > COMPONENTS > CONTACT > FIELDS (for fields to show in a contact page)
or
TOP MENU > USERS > FIELDS (for fields to show in Joomla User profiles)
Click the NEW button, and let's create your first GMAP Custom Field
Title: Set a descriptive title for your GMAP field
Type: if the plugin is enabled, your'll find the field: GoogleMaps Map (gmap) plugin type. Select it
Name: this should be filled automatically after saving the field once
Label: Set the label for your field
Description: You can set a description for the field, it will show when a user woul hover the field label with the mouse cursor
Required: Should the user ba able so submit the form without setting the field
Default Value: Don't set it here. Default values are to be set in the following section
Form Settings sectionThis section shows settings for the form field map.
Map Width: set the width of the form map. Don't forget to specify % or px units
Map Height: set the height of the form map. Don't forget to specify px unit
Default Latitude & Default Longitude: Default coordinates to load the form map
Default Maptype: Select the default maptype for the backend
Map Custom Styling: You can customize the map layout colors. This will override your MAPTYPE setting in the previous parameter. Basically you need to paste in this field, the JSON code you get on https://mapstyle.withgoogle.com/
Settings for the rendered field maps
Front End Map Width & Height: Front map differs from the form map. You can set it with its own dimensions
Map Mode: Select if the field map should be rendered thanks to the GoogleMaps JAVASCRIPT or STATIC API. Javascript is the default classic interactive GoogleMaps map. The STATIC Maps use the GoogleChart API to render a GoogleMap as an image. Both maps can nest multiple fields as multiple markers, both maps can be styles, both maps markers can have radius areas. Only map markers can not be customized on the Static Maps as they can on a Javascript map. On a Static map, Markers can be tiny or normal (size) and colored (10 colors presets).
Infowindow Source: You can enable the infowindow for each markers. It's content can be the field title, description or placeholder hint.
Default Marker: (Javascript API only) Default markers are CSS markers with a pulse animation. You can select if from various presets and also add your own edits of the CSS
Custom Marker: You can also prefer a PNG marker, select a one from those we included or upload your own.
When the field is created and saved, it can be edited in the Article forms, User Forms, Contact forms, depending on where you set it.
Note: Each of these 3 components (com_content, com_users and com_contacts) have their own custom field managers using Joomla custom fields.
Here is an example of what users could get in this forms:
- Created on .
- Last updated on .
